Supercharge Management & Automation with Ansible Azure
2024-03-11 15:00:00
Provisioning Azure Resources with Ansible Azure
After ensuring that Ansible is authenticated with Azure, IT is time to put that synergy to work. Provisioning resources with Ansible Azure involves using Ansible playbooks to automate the creation of Azure resources, such as VMs, storage accounts, networks, and more.
Ansible provides modules designed for interacting with Azure’s APIs, letting you quickly manage Azure resources through automation.
To provision Azure resources with Ansible Azure, carry out the following, where you will add snippets to a playbook one step at a time:
1. Create a file called deploy_vm.yml as your Ansible playbook, and add the following snippet.
This snippet outlines the structure of an Ansible playbook intended to deploy a VM in Azure.
---
# Specify the name of the playbook aimed at Deploying an Azure VM
- name: Deploy Virtual Machine in Azure
  # Define the target hosts where the tasks will be executed.
  hosts: localhost
  # Specify the list of tasks to be executed.
  tasks:
2. Next, add the following snippet to your playbook, which creates an Azure resource group named myResourceGroup-001 in the eastus region.
Your Azure infrastructure sprawls across a digital landscape with VMs, databases, and storage accounts. Amidst this complexity lies the beacon of order—the resource group.
A resource group sets the foundation for efficient infrastructure management and enables seamless integration with Ansible’s automation capabilities. All resources in Azure must belong to a resource group.
    # Define the task to create a resource group.
    - name: Create Resource Group
      # Use the azure_rm_resourcegroup module to manage Azure resource groups.
      azure_rm_resourcegroup:
        # Specify the name of the resource group to be created.
        name: myResourceGroup-001
        # Specify the Azure region where the resource group will be created.
        location: eastus
3. Populate the snippet below to the same playbook, which creates a virtual network (VNet).
In Azure, a VNet logically isolates the network in the cloud. You can use a VNet to securely connect Azure resources, like VMs, to each other, to the internet, and even to on-premises networks.
    # Define the task of creating a virtual network.
    - name: Create Virtual Network
      # Use the azure_rm_virtualnetwork module to manage Azure VNets.
      azure_rm_virtualnetwork:
        # Specify the resource group in which the virtual network will be created.
        resource_group: myResourceGroup-001
        # Specify the name of the virtual network to be created.
        name: myVirtualNetwork-001
        # Specify the address prefixes for the virtual network.
        address_prefixes:
          - "13.0.0.0/16"
        # Specify the Azure region where the virtual network will be created.
        location: eastus
4. Now, create a subnet by adding the following snippet to your playbook.
Think of subnets as clever partitions within your VNet that help organize and segment your network resources. This organization makes managing your network resources easier and amps up your control over traffic flow and security.
    # Define the task to create a subnet.
    - name: Create Subnet
      # Use the azure_rm_subnet module to manage Azure subnets.
      azure_rm_subnet:
        # Specify the resource group where the virtual network resides.
        resource_group: myResourceGroup-001
        # Specify the name of the virtual network where the subnet will be created.
        virtual_network_name: myVirtualNetwork-001
        # Specify the name of the subnet to be created.
        name: mySubnet-001
        # Specify the address prefix for the subnet.
        address_prefix: "13.0.1.0/24"
5. Add another snippet to the playbook, which creates a public IP.
Public IP addresses allow Azure resources, such as the VMs and application gateways, to communicate with the internet or other Azure resources over the internet.
    # Define the task to create a public IP address.
    - name: Create Public IP Address
      # Use the azure_rm_publicipaddress module to manage Azure public IP addresses.
      azure_rm_publicipaddress:
        # Specify the resource group where the public IP address will be created.
        resource_group: myResourceGroup-001
        # Specify the allocation method for the public IP address (Static or Dynamic).
        allocation_method: Static
        # Specify the name of the public IP address to be created.
        name: myPublicIP-001
        # Specify the SKU (Standard or Basic) for the public IP address.
        sku: Standard
        # Specify the Azure region where the public IP address will be created.
        location: eastus
6. Subsequently, input the following snippet to your playbook, which creates a Network Security Group (NSG) that allows you to control inbound and outbound traffic to your Azure resources.
An NSG acts as a virtual firewall that filters network traffic based on user-defined rules.
    # Define the task to create an NSG.
    - name: Create Network Security Group
      # Use the azure_rm_securitygroup module to manage Azure NSGs.
      azure_rm_securitygroup:
        # Specify the resource group where the NSG will be created.
        resource_group: myResourceGroup-001
        # Specify the name of the NSG to be created.
        name: myNSG-001
        # Specify the Azure region where the NSG will be created.
        location: eastus
7. Moving on, create a Virtual Network Interface Card (NIC) by adding the following snippet to the playbook.
Each Virtual NIC buddies up with a specific Azure resource, like a VM, and gives IT the power to connect with other resources inside your VNet. Virtual NICs can also venture out to external networks, including the vast expanse of the internet.
Moreover, NICs dish out access to IP addresses, sort out routing, and keep your network secure with nifty features.
    # Define the task to create a Virtual NIC.
    - name: Create Virtual Network Interface Card
      # Use the azure_rm_networkinterface module to manage Azure Virtual NICs.
      azure_rm_networkinterface:
        # Specify the resource group where the Virtual NIC will be created.
        resource_group: myResourceGroup-001
        # Specify the name of the Virtual NIC to be created.
        name: myNIC-001
        # Specify the name of the VNet where the Virtual NIC will be connected.
        virtual_network: myVirtualNetwork-001
        # Specify the Subnet's name within the VNet where the Virtual NIC will be located.
        subnet: mySubnet-001
        # Specify the name of the Public IP Address associated with the Virtual NIC.
        public_ip_name: myPublicIP-001
        # Specify the Azure region where the Virtual NIC will be created.
        location: eastus
8. Add the following snippet to the playbook, which creates an Azure VM.
Azure VMs provide scalable and on-demand computing resources, allowing you to deploy and manage virtualized workloads without the need to maintain physical hardware.
    # Define the task to create a VM.
    - name: Create Virtual Machine
      # Use the azure_rm_virtualmachine module to manage Azure VMs.
      azure_rm_virtualmachine:
        # Specify the resource group where the VM will be created.
        resource_group: myResourceGroup-001
        # Specify the name of the VM to be created.
        name: myVM-001
        # Specify the size of the VM.
        vm_size: Standard_DS1_v2
        # Specify the username for the VM's admin account.
        admin_username: azureuser
        # Specify the password for the VM's admin account.
        admin_password: Azureuser@2023
        # Enable password-based SSH authentication.
        ssh_password_enabled: True
        # Specify the image details for the VM.
        image:
          offer: UbuntuServer
          publisher: Canonical
          sku: '18.04-LTS'
          version: latest
        # Specify tags for the VM.
        tags:
          environment: production
Following the steps up to this point, you will have the complete playbook demonstrated below.
This playbook provisions various resources in Azure, including a resource group, virtual network, subnet, public IP address, network interface card (NIC), and the VM itself.
Ansible’s declarative syntax and Azure modules make defining and executing provisioning tasks quicker, enabling you to scale your infrastructure efficiently in the Azure cloud.
---
# Specify the name of the playbook aimed at Deploying an Azure VM
- name: Deploy Virtual Machine in Azure
# Define the target hosts where the tasks will be executed.
hosts: localhost
# Specify the list of tasks to be executed.
tasks:
# Define the task to create a resource group.
- name: Create Resource Group
# Use the azure_rm_resourcegroup module to manage Azure resource groups.
azure_rm_resourcegroup:
# Specify the name of the resource group to be created.
name: myResourceGroup-001
# Specify the Azure region where the resource group will be created.
location: eastus
# Define the task of creating a virtual network.
- name: Create Virtual Network
# Use the azure_rm_virtualnetwork module to manage Azure VNets.
azure_rm_virtualnetwork:
# Specify the resource group in which the virtual network will be created.
resource_group: myResourceGroup-001
# Specify the name of the virtual network to be created.
name: myVirtualNetwork-001
# Specify the address prefixes for the virtual network.
address_prefixes:
- "13.0.0.0/16"
# Specify the Azure region where the virtual network will be created.
location: eastus
# Define the task to create a subnet.
- name: Create Subnet
# Use the azure_rm_subnet module to manage Azure subnets.
azure_rm_subnet:
# Specify the resource group where the virtual network resides.
resource_group: myResourceGroup-001
# Specify the name of the virtual network where the subnet will be created.
virtual_network_name: myVirtualNetwork-001
# Specify the name of the subnet to be created.
name: mySubnet-001
# Specify the address prefix for the subnet.
address_prefix: "13.0.1.0/24"
# Define the task to create a public IP address.
- name: Create Public IP Address
# Use the azure_rm_publicipaddress module to manage Azure public IP addresses.
azure_rm_publicipaddress:
# Specify the resource group where the public IP address will be created.
resource_group: myResourceGroup-001
# Set the allocation method for the public IP address (Static or Dynamic).
allocation_method: Static
# Specify the name of the public IP address to be created.
name: myPublicIP-001
# Specify the SKU (Standard or Basic) for the public IP address.
sku: Standard
# Specify the Azure region where the public IP address will be created.
location: eastus
# Define the task to create an NSG.
- name: Create Network Security Group
# Use the azure_rm_securitygroup module to manage Azure NSGs.
azure_rm_securitygroup:
# Specify the resource group where the NSG will be created.
resource_group: myResourceGroup-001
# Specify the name of the NSG to be created.
name: myNSG-001
# Specify the Azure region where the NSG will be created.
location: eastus
# Define the task to create a Virtual NIC.
- name: Create Virtual Network Interface Card
# Use the azure_rm_networkinterface module to manage Azure Virtual NICs.
azure_rm_networkinterface:
# Specify the resource group where the Virtual NIC will be created.
resource_group: myResourceGroup-001
# Specify the name of the Virtual NIC to be created.
name: myNIC-001
# Specify the name of the VNet where the Virtual NIC will be connected.
virtual_network: myVirtualNetwork-001
# The Subnet's name within the VNet where the Virtual NIC will be located.
subnet: mySubnet-001
# Specify the name of the Public IP Address associated with the Virtual NIC.
public_ip_name: myPublicIP-001
# Specify the Azure region where the Virtual NIC will be created.
location: eastus
# Define the task to create a VM.
- name: Create Virtual Machine
# Use the azure_rm_virtualmachine module to manage Azure VMs.
azure_rm_virtualmachine:
# Specify the resource group where the VM will be created.
resource_group: myResourceGroup-001
# Specify the name of the VM to be created.
name: myVM-001
# Specify the size of the VM.
vm_size: Standard_DS1_v2
# Specify the username for the VM's admin account.
admin_username: azureuser
# Specify the password for the VM's admin account.
admin_password: Azureuser@2023
# Enable password-based SSH authentication.
ssh_password_enabled: True
# Specify the image details for the VM.
image:
offer: UbuntuServer
publisher: Canonical
sku: '18.04-LTS'
version: latest
# Specify tags for the VM.
tags:
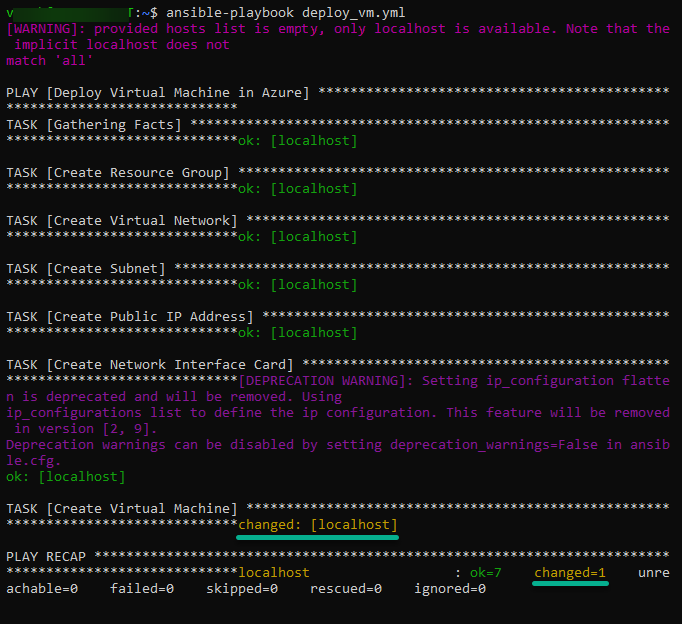
environment: production9. Ultimately, run the ansible-playbook command below to execute your playbook (deploy_vm.yml) using the
ansible-playbook deploy_vm.ymlIf all goes well, the Azure resources creation process will be initiated, and the output below will appear.

[Contact Techihaus for get solution for your startup]
Source link